

A tripod is a three-legged support device used to hold a camera steady during photography or videography. Tripods are especially useful when shooting in low light conditions, or when you need to have a slow shutter speed to capture motion blur. They also help you keep your shots level, and enable you to get into awkward positions or reach higher angles. In short, using a tripod allows you to take better, more professional-looking shots, and reduces camera shake that can cause blur in your photos.
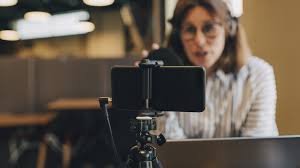
Choose the Right Tripod for Vlogging
Height
The height of the best vlogging tripod is an important consideration when vlogging. You need to be able to adjust the tripod to your eye level or a little above it. Choose a tripod with an adjustable center column that can be raised or lowered to the desired height. If you’re vlogging while standing, look for a tripod that can extend to your full height.
Portability
Vlogging often involves filming on the go, so you want a best vlogging tripod that is easy to carry around. Look for a tripod that is lightweight and compact, as well as easy to disassemble and pack into your camera bag. A tripod with reversible legs or a detachable center column is also handy, as it allows you to make the tripod as compact as possible when you’re on the move.
Stability
Stability is a crucial factor when vlogging, as you don’t want your shots to be shaky or unstable. A sturdy tripod with a good weight capacity is important, especially if you’re using a heavy camera. Look for a tripod with legs that have rubber feet for grip and stability on any surface. The best vlogging tripod with a hook on the center column is also useful, as you can hang a weight from it for added stability in windy conditions.
Ease of Use
When vlogging, you need to be able to set up your tripod quickly and easily. Look for a tripod with simple, straightforward controls for adjusting the height and angle of the camera. A tripod with a quick-release plate makes it easy to switch from hand-held shooting to tripod-mounted shooting without having to fiddle with screws.
Benefits of Using a Tripod for Vlogging
A tripod is a three-legged support that provides stability and stability to a camera when recording a video. Tripods are essential for vloggers, as they help ensure that the footage is smooth and steady, providing a professional look to their content.
Improved Stability
Using a tripod provides stability to the camera while recording, which is particularly important when vlogging. Hand-held footage can be shaky and unsteady, making it difficult to watch. Tripods eliminate this problem, allowing the camera to remain still and providing a smooth and stable image. This not only makes the video more watchable but also adds a professional touch to the content.
Flexibility
Tripods are highly flexible and adjustable, allowing vloggers to change the angle and height of the camera with ease. This is particularly important when filming in different locations or environments, as it provides the vlogger with the ability to adjust the camera’s position to suit the scene.
Time-saving
Tripods save time by eliminating the need to re-shoot footage that was not stable or of good quality. With a tripod, the vlogger can take their time to set up the shot, adjust the camera’s position, and focus on the content, knowing that the footage will be stable and of high quality.
How to Set Up and Adjust Your Tripod for Vlogging
Setting up and adjusting the best vlogging tripod correctly is crucial for obtaining stable and high-quality footage while vlogging. In this article, we will discuss the steps involved in setting up and adjusting a tripod for vlogging.
Step 1: Choose a flat surface: Before setting up the tripod, it is important to choose a flat and level surface to ensure stability. A flat surface ensures that the tripod legs are spread evenly and the camera remains steady during recording.
Step 2: Extend the legs: Once you have found a suitable flat surface, extend the tripod legs to the desired height. Tripods usually have adjustable legs that can be extended to different heights, depending on the vlogger’s preference.
Step 3: Lock the legs: Once you have extended the legs, make sure to lock them securely in place to prevent the tripod from collapsing during recording.
Step 4: Mount the camera: Next, attach the camera to the tripod’s head. This can be done by screwing the camera into the tripod’s head or by using a quick-release plate.
Step 5: Adjust the head: Once the camera is mounted, adjust the tripod head to the desired angle. Tripod heads can be adjusted to different angles to accommodate different recording scenarios. Some tripods have a ball head, which allows for smooth and easy adjustments.
Step 6: Fine-tune the position: Finally, fine-tune the position of the camera by adjusting the height of the tripod or by tilting the camera. Make sure the camera is level and aimed in the direction you want to record.
Essential Tips and Tricks to Use When Vlogging With a Tripod
Vlogging with a tripod can greatly enhance the quality and stability of your videos, but it’s important to use it correctly. Here are some essential tips and tricks to keep in mind when vlogging with a tripod.
Use a tripod with adjustable legs
Having adjustable legs on a tripod allows you to adapt to different shooting situations and environments. You can easily change the height of the tripod or adjust the legs to stabilize the camera on uneven surfaces.
Consider the weight of your camera:
When choosing a tripod, consider the weight of your camera. The tripod should be sturdy enough to support the weight of the camera and keep it steady while recording.
Use a ball head
A ball head allows you to adjust the camera angle quickly and smoothly. It is also more versatile than a fixed head, as you can easily switch between horizontal and vertical shots.
Keep the camera level
Making sure that the camera is level will ensure that your footage looks professional and steady. You can adjust the tripod legs or the ball head to ensure that the camera is level.
Use a tripod with a quick-release plate
A quick-release plate allows you to easily detach and reattach the camera from the tripod. This is particularly useful when you need to quickly switch from tripod to hand-held shooting.
Use the tripod for stability, not for static shots
While a tripod provides stability, it shouldn’t be used to keep the camera completely still. Incorporating small camera movements can add life to your footage and make the video more engaging for the audience.
Practice makes perfect
As with any new skill, practicing with a tripod takes time and patience. Experiment with different tripod set-ups and camera angles to find what works best for your vlogging style.
FAQs on Vlogging With a Tripod
What is the purpose of using a tripod for vlogging?
A tripod is used in vlogging to provide stability and prevent camera shake during recording. This helps to ensure that the footage is steady and professional-looking.
What type of tripod is best for vlogging?
A best vlogging tripod with adjustable legs, a ball head, and a quick-release plate is ideal for vlogging. The adjustable legs allow for versatility in different shooting scenarios, the ball head provides smooth and quick adjustments, and the quick-release plate allows for easy detachment and reattachment of the camera.
Do I need a heavy-duty tripod for vlogging?
The weight of the tripod you need depends on the weight of your camera. It is important to choose a tripod that is sturdy enough to support the weight of your camera and keep it steady during recording.
Can I use a tripod for both indoor and outdoor vlogging?
Yes, a tripod can be used for both indoor and outdoor vlogging. The adjustable legs allow you to adapt to different shooting environments, whether you are on a flat surface or an uneven terrain.
Comments are closed.